Unit 1 About Me: Knolling Photograph, Analysis, and Presentation
Introduction Letter Remix | Visual Project | Introduction | Visual Literacy | Reflection
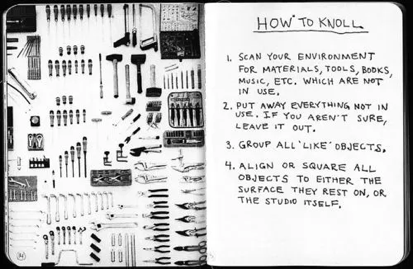
Do you love music? Running? Painting? Cooking? Photography? Now is your chance to share your story with the class. For this exercise, spend some time considering your interests and hobbies. Once you’ve thought of a few, consider some objects that represent them. Then, with those objects, knoll them, that is, arrange them in parallel or at a 90 degree angle. Or for our visual learners:
Your composition should reflect you and allow your classmates and me to get to know you better.
Knolling photo must include:
● A solid background—You may use a pattern if used thoughtfully.
● A theme (i.e. adventure, technology, nature, etc.)—What story are you telling about yourself?
● Categorization—How might you group similar objects? By color? Shape? Size? Texture?
● Objects—Use a variety of objects to say something about yourself. Try to include at least 10 objects in your photograph.
Take a picture of your composition and upload to your computer. Insert the knolling photograph into a Word or Google Document. After you’ve completed these steps, write a 300 word analysis of your knolling photograph.
What to include in the 300 word analysis:
● What this knolling photograph says about you. What story are you trying to tell? What objects and theme did you use?
● Identify the rhetorical situation: genre, audience, and constraints. There are many ways to consider the rhetorical situation, so, on the other hand, you might consider writer, reader, and purpose.
Presentation:
In class, you will present your knolling photograph and use your analysis as a guide. Prepare a brief 3 minute presentation while showing us what rhetorical choices you made while composing your photograph. Come prepared to share and listen to other writers in the class introduce themselves!
“The Instagrammer activity:” What students already know
Discussion Starter | 15 min | visual design | digital aesthetic
(Note: This is also a lesson in the Web Toolkit)
One of the most striking things I’ve noticed with my own students is how little they think they know about visual design… this coming from students with three Instagram accounts! The trick here is to begin by showing them what they already know—in the contexts of visual design they already use.
The Activity: Near the end of class, send your students out in groups with fifteen minutes, a phone with a camera, and Instagram. Tell them the following:
Done! Now, before your next class, take them through each of these images (throw them into a PowerPoint for ease) and spend some time as a class making comments about the visual design choices. As students go through, ask them to notice any striking visual design decisions. As they talk about the image, write down any important concepts they bring up on the board, and build the discussion from there. You might also ask each group what rhetorical choices they made in ‘composing’ their image. All of these can be tied to good visual design, website design, and even writing! Some of the concepts you might talk about:
·Regularity vs. irregularity
·Form
·Repetition
·Rhythm/Frequency
·Weight and space
·Color / Contrast
·Mirroring
·Rotation
·Size/Upscaling/
Downscaling
·Movement / Direction
·Symmetry
·Distance
·Negatives / positives
·Variation
·Influence
·Modification
The Backstory
Introductory activity | visual design | digital aesthetic
Draw (either digitally, or by hand) a portrait of yourself in your memoir. This character is you as you see yourself having completed the story that you described in your initial letter. Make it reflect something true about yourself and what you want to accomplish in this class.
Show your new group members your ‘avatar’ and post the image on your blog (either as a profile image, or as a post). Note that I will never grade you on artistic ability-- but this is going up on your site, so it should reflect your best effort! Be sure to check out the tools on our course site to make this easier for you.
Analyzing Multimodal Examples
Visual Analysis | Visual Design | Genre Study | In-class activity | Collaboration
In your groups, please visit, discuss, and reflect on the examples below and the way they incorporate visual elements:
1. https://www.nytimes.com/interactive/2018/04/23/business/energy-environment/big-windmills.html
2. https://www.nytimes.com/2017/04/15/business/from-zombie-malls-to-bonobos-americas-retail-transformation.html
3. https://www.newyorker.com/magazine/2017/12/18/micro-revolutions-spidersilk-edible-drones-artificial-wombs-and-more
4. https://www.washingtonpost.com/graphics/2017/national/escape-time/?utm_term=.55296cfeeaf9
5. https://www.nationalgeographic.com/magazine/2017/07/the-science-of-hummingbirds/
6. https://www.washingtonpost.com/graphics/2017/investigations/harvey-urban-planning/?utm_term=.601344235e36
7. https://www.nytimes.com/interactive/2017/05/18/climate/antarctica-ice-melt-climate-change.html?_r=1&utm_campaign=Revue%20newsletter&utm_medium=Newsletter&utm_source=Klikdinges
8. https://www.theatlantic.com/science/archive/2018/04/are-we-earths-only-civilization/557180/
9. https://www.desmoinesregister.com/pages/interactives/harvest-of-change/
10. https://pudding.cool/2017/05/song-repetition/
11. https://www.theatlantic.com/family/archive/2018/04/alexa-manners-smart-speakers-command/558653/
12. https://www.nytimes.com/2018/04/23/science/prairie-fires-nachusa-illinois.html
Some questions to consider:
Portrait of An Artist
Visual Project | Introduction | Icebreaker | Composition
At the beginning of several class periods (at least two weeks), give students notecards and ask them to draw themselves how they're feeling that day for at least 10 minutes. You might keep it simple and require nothing further, or you might be more specific and ask how they're feeling about the reading or the semester.
After students complete their drawings, have them share in small groups or in large group. Collect the notecards after each class. Hand back the stack of notecards at a later date and have students reflect on how their moods changed about the semester or from day to day.
Knolling photo must include:
● A solid background—You may use a pattern if used thoughtfully.
● A theme (i.e. adventure, technology, nature, etc.)—What story are you telling about yourself?
● Categorization—How might you group similar objects? By color? Shape? Size? Texture?
● Objects—Use a variety of objects to say something about yourself. Try to include at least 10 objects in your photograph.
Take a picture of your composition and upload to your computer. Insert the knolling photograph into a Word or Google Document. After you’ve completed these steps, write a 300 word analysis of your knolling photograph.
What to include in the 300 word analysis:
● What this knolling photograph says about you. What story are you trying to tell? What objects and theme did you use?
● Identify the rhetorical situation: genre, audience, and constraints. There are many ways to consider the rhetorical situation, so, on the other hand, you might consider writer, reader, and purpose.
Presentation:
In class, you will present your knolling photograph and use your analysis as a guide. Prepare a brief 3 minute presentation while showing us what rhetorical choices you made while composing your photograph. Come prepared to share and listen to other writers in the class introduce themselves!
“The Instagrammer activity:” What students already know
Discussion Starter | 15 min | visual design | digital aesthetic
(Note: This is also a lesson in the Web Toolkit)
One of the most striking things I’ve noticed with my own students is how little they think they know about visual design… this coming from students with three Instagram accounts! The trick here is to begin by showing them what they already know—in the contexts of visual design they already use.
The Activity: Near the end of class, send your students out in groups with fifteen minutes, a phone with a camera, and Instagram. Tell them the following:
- Go out and take a picture that ‘makes a statement’. (Clarify that how they interpret this is entirely up to them. One image per group. Nothing that gets them in trouble :) ).
- Tell them to take a picture, filter it, caption or title it, and send it to you via email.
Done! Now, before your next class, take them through each of these images (throw them into a PowerPoint for ease) and spend some time as a class making comments about the visual design choices. As students go through, ask them to notice any striking visual design decisions. As they talk about the image, write down any important concepts they bring up on the board, and build the discussion from there. You might also ask each group what rhetorical choices they made in ‘composing’ their image. All of these can be tied to good visual design, website design, and even writing! Some of the concepts you might talk about:
·Regularity vs. irregularity
·Form
·Repetition
·Rhythm/Frequency
·Weight and space
·Color / Contrast
·Mirroring
·Rotation
·Size/Upscaling/
Downscaling
·Movement / Direction
·Symmetry
·Distance
·Negatives / positives
·Variation
·Influence
·Modification
The Backstory
Introductory activity | visual design | digital aesthetic
Draw (either digitally, or by hand) a portrait of yourself in your memoir. This character is you as you see yourself having completed the story that you described in your initial letter. Make it reflect something true about yourself and what you want to accomplish in this class.
Show your new group members your ‘avatar’ and post the image on your blog (either as a profile image, or as a post). Note that I will never grade you on artistic ability-- but this is going up on your site, so it should reflect your best effort! Be sure to check out the tools on our course site to make this easier for you.
Analyzing Multimodal Examples
Visual Analysis | Visual Design | Genre Study | In-class activity | Collaboration
In your groups, please visit, discuss, and reflect on the examples below and the way they incorporate visual elements:
1. https://www.nytimes.com/interactive/2018/04/23/business/energy-environment/big-windmills.html
2. https://www.nytimes.com/2017/04/15/business/from-zombie-malls-to-bonobos-americas-retail-transformation.html
3. https://www.newyorker.com/magazine/2017/12/18/micro-revolutions-spidersilk-edible-drones-artificial-wombs-and-more
4. https://www.washingtonpost.com/graphics/2017/national/escape-time/?utm_term=.55296cfeeaf9
5. https://www.nationalgeographic.com/magazine/2017/07/the-science-of-hummingbirds/
6. https://www.washingtonpost.com/graphics/2017/investigations/harvey-urban-planning/?utm_term=.601344235e36
7. https://www.nytimes.com/interactive/2017/05/18/climate/antarctica-ice-melt-climate-change.html?_r=1&utm_campaign=Revue%20newsletter&utm_medium=Newsletter&utm_source=Klikdinges
8. https://www.theatlantic.com/science/archive/2018/04/are-we-earths-only-civilization/557180/
9. https://www.desmoinesregister.com/pages/interactives/harvest-of-change/
10. https://pudding.cool/2017/05/song-repetition/
11. https://www.theatlantic.com/family/archive/2018/04/alexa-manners-smart-speakers-command/558653/
12. https://www.nytimes.com/2018/04/23/science/prairie-fires-nachusa-illinois.html
Some questions to consider:
- What’s the point?
- What’s working well?
- What’s not working well?
Portrait of An Artist
Visual Project | Introduction | Icebreaker | Composition
At the beginning of several class periods (at least two weeks), give students notecards and ask them to draw themselves how they're feeling that day for at least 10 minutes. You might keep it simple and require nothing further, or you might be more specific and ask how they're feeling about the reading or the semester.
After students complete their drawings, have them share in small groups or in large group. Collect the notecards after each class. Hand back the stack of notecards at a later date and have students reflect on how their moods changed about the semester or from day to day.
